In this article, we’ll cover how to scan documents on both Mac and Windows systems, along with tips for efficiently organizing and storing your scanned files.
What we cover
Preliminary Steps: Getting Ready to Scan
Before delving into the scanning process, there are a few initial steps you should take to make sure everything goes smoothly. Here’s what you need to do:
- Multifunction Printer: Make sure you have a multifunction or all-in-one printer that is up and running, and properly connected to your computer or network.
- Document or photo to be scanned: Prepare the documents or photos you wish to scan and arrange them in the order you intend to scan them. Make sure they are clean, clear, and free from dust or creases.
- Software/drivers: Install the required drivers and software. Visit the website of the manufacturer and download the necessary drivers and software tailored to your specific printer model.
Setting up your printer correctly is the crucial step for successful scanning. Check if the printer is properly connected and recognized by your computer. If your computer doesn’t recognize it, you’ll need to manually add the printer to your device. Also, giving your scanner bed a quick wipe before scanning ensures there’s no dust or smudge that could affect your scan quality.
Depending on the type of document or your scanning purpose, you might need to adjust a few scanning settings:
- Resolution: Choose the right scan resolution depending on the kind of documents you’re scanning. For most text documents, a resolution of 300 dpi is sufficient enough, while images may require higher resolutions. Remember, the high the resolutions, the larger the size.
- Color mode: Select black and white (greyscale) or text mode for text documents, and opt for color mode when dealing with images or documents with fine details.
- Format: Choose the appropriate file format for saving the scanned documents depending on the intended purpose. For example, when working with text documents, choose PDF for easy search and editing. For images and colorful text, go for PNG or JPEG formats.
Step-by-Step Scanning Guide for Mac
If you’re looking to scan some documents on a Mac computer, it’s actually quite simple. No need for extra software – the built-in Scanner tool has got you covered.
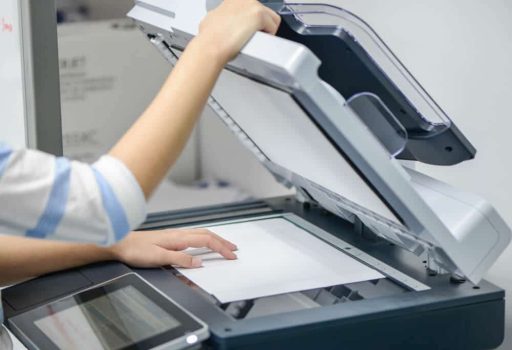
- Open the scanner lid and place your document or photo face-down on the scanner bed and close the lid. Make sure to align the document or photo in the upper right corner.
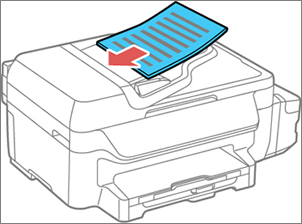
- If your printer has Automatic Document Feeder (ADF), open the ADF lid and move paper guides to fit the width of the documents you’re loading. Place all your documents into the ADF and make sure they are properly aligned along the paper guide. Usually, you’ll place them face-up in the feeder but it may vary depending on the printer (check your manual).
- Click the Apple menu
 and select System Preferences.
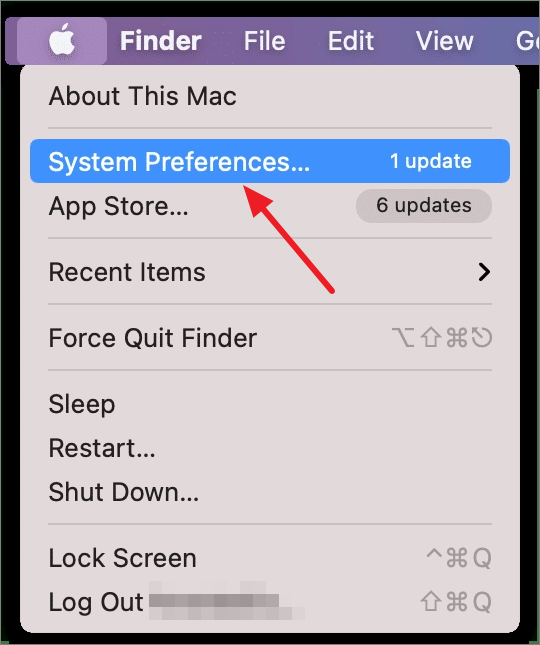
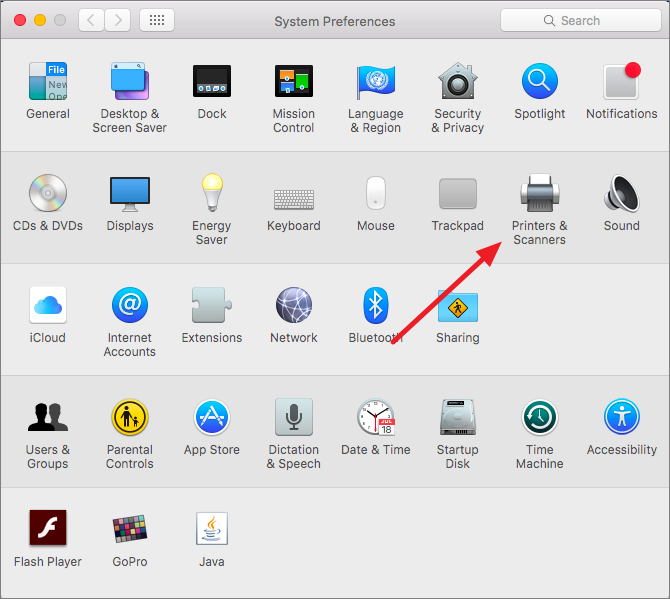
- Then, click on Printers & Scanners.
- Choose the printer from the list on the right, select the Scan tab and then, click on Open Scanner.

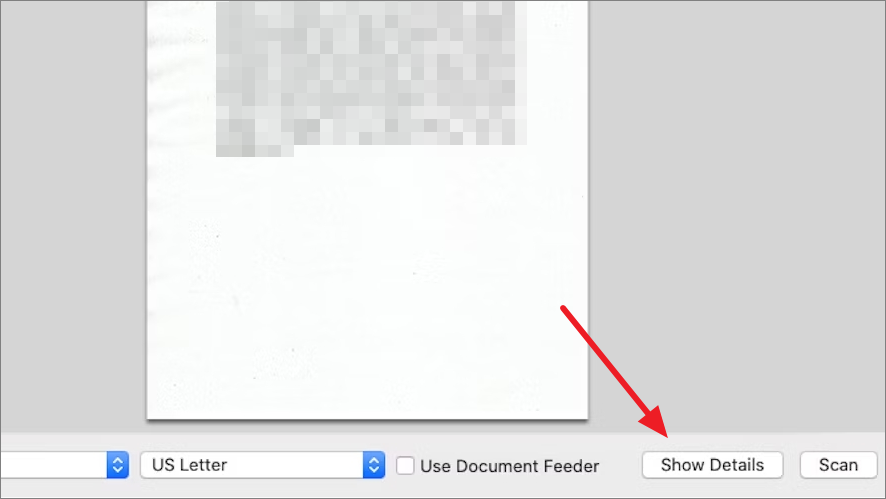
- In Scanner Program, click the ‘Show Details‘ button at the lower right corner to adjust the scan settings such as color mode, resolution, file format, etc.
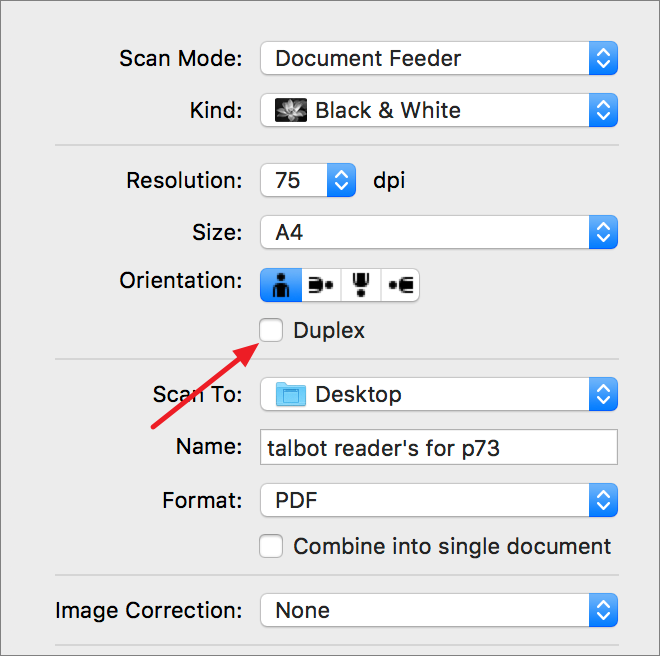
- Choose the paper source from the Scan Mode drop-down: Flatbed or Document Feeder.
- Select the correct color mode (Kind): Text, Black & White, or Color.

- Customize the scanning resolution, paper size, and orientation based on the document you’re scanning. Select the appropriate options from the respective drop-down menus.

- Select the Duplex or Two-sided option to scan both sides of the documents (if applicable). If you have a flatbed printer, you may have an Auto Selection drop-down. From that, choose Detect Separate Items to detect multiple items on the flatbed and save them separately.
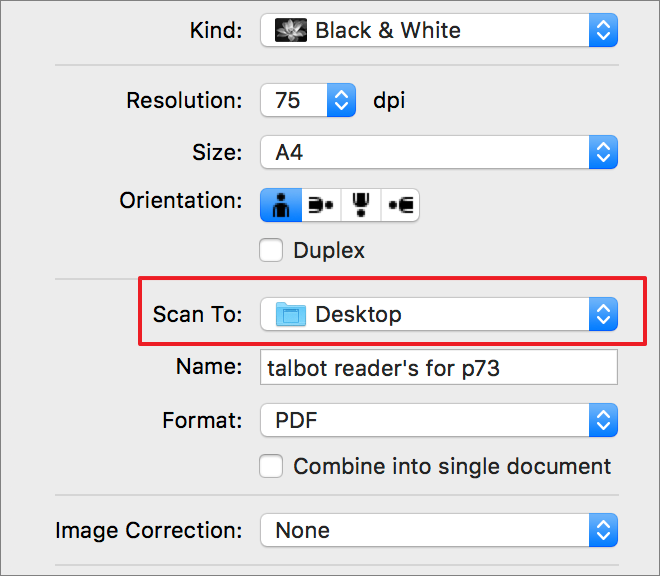
- Next, choose where you want to save the scanned documents using the Scan To drop-down menu. Then, give a name to the file.
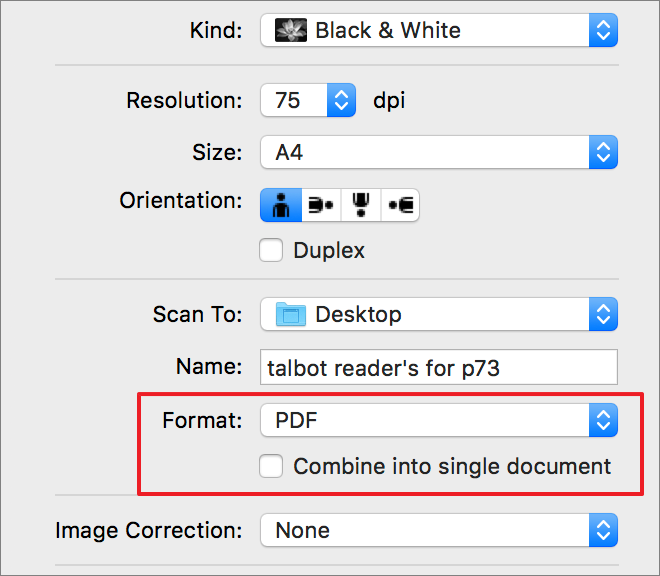
- Select the file format from the Format drop-down. For example, JPEG, TIFF for images, and PDF for text documents). If you are scanning a multi-page document, make sure to select the Combine into single document option to save the file as a single PDF file.
- If you wish to make to adjustment to image coloring or exposure, select Manual from the Image Correction drop-down.
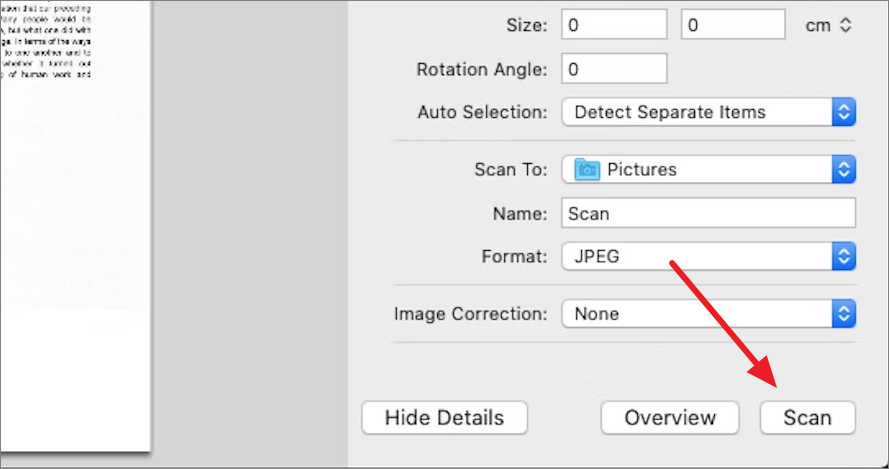
- To preview the document or image that you’re about to scan, click Overview. This feature lets you check alignment, make necessary adjustments, and see if there’s anything you want to remove or adjust before scanning.
- Once you made all the necessary adjustments, click the Scan button to kick off the scanning process.
- The scanned files will be saved in the specified location.
Some advanced printers may offer extra features like barcode recognition, color restoration, or scan-to-email options. However, this feature can be usually accessed from Printer’s dedicated software such as EPSON Scan, HP Scan, etc. Feel free to explore these features if your printer supports them.
If your printer supports AirPrint, you may even be able to scan directly from your Mac, iPad, and iPhone, without extra software. AirPrint is Apple’s technology that lets you wirelessly print from Apple devices without installing printer-specific drivers.
Step-by-Step Scanning Guide for Windows
Similar to Mac computers, Windows also has a built-in tool called ‘Windows Fax & Scan’ that makes scanning documents and photos easy. If your printer didn’t come with any extra scanning software or if you prefer using the Windows built-in features, then these instructions are for you.
- Lift the scanner lid and place your document or photo face-down on the scanner bed. Make sure it’s properly aligned to the upper right corner of the scanner bed.
- If you have an ADF, follow these steps instead:
- Open the document tray and slide the document guides all the way out.

- Gently fans the papers to avoid misfeeds and paper jams. Next, place your documents face up (or face down depending on the printer) and insert them with the short edge first into the ADF until they stop.
- Finally, adjust the ADF edge guides against the papers, but not too tight.
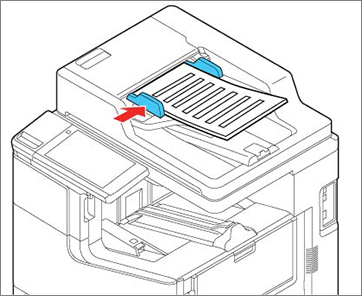
- Open the document tray and slide the document guides all the way out.
- Click the Start menu and search for Windows Fax & Scan and select the app.

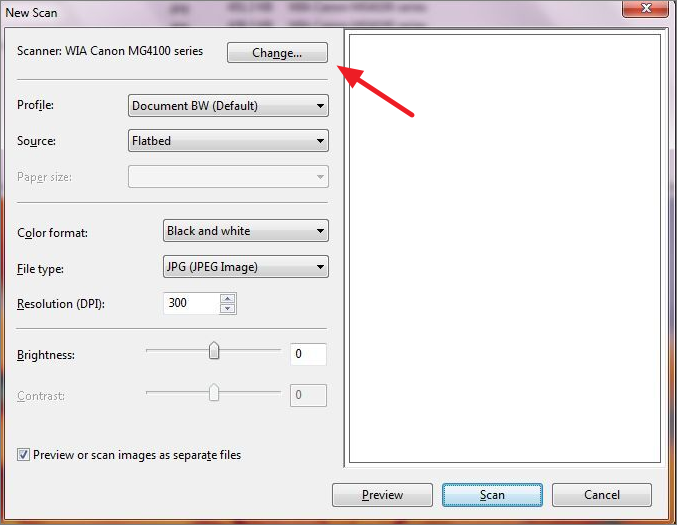
- When the app opens, click the New Scan option on the toolbar.

- In the New Scan window, make sure the right device is selected under the Scanner option. If not, click the Change the button and select the multifunction printer.
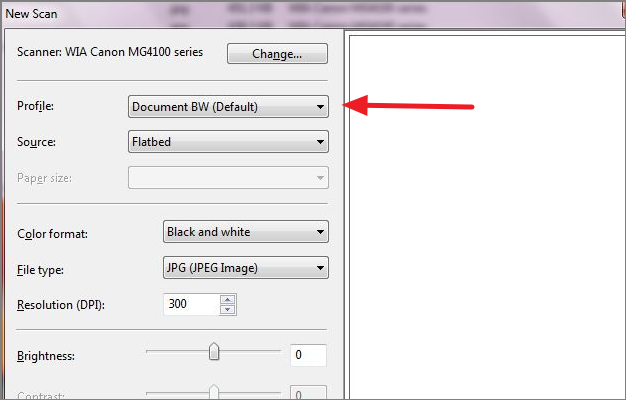
- From the Profile menu, choose your scan profile: Photo, Documents, or Last Used Settings.
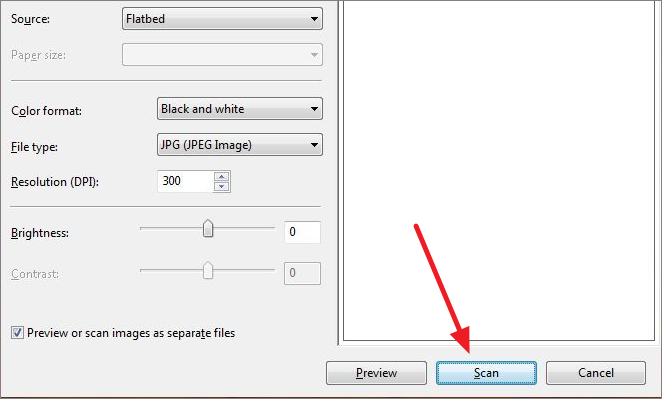
- Next, use the Source drop-down to select the paper source: Flatbed, Feeder (Scan One Side), and Feeder (Scan Both Sides).
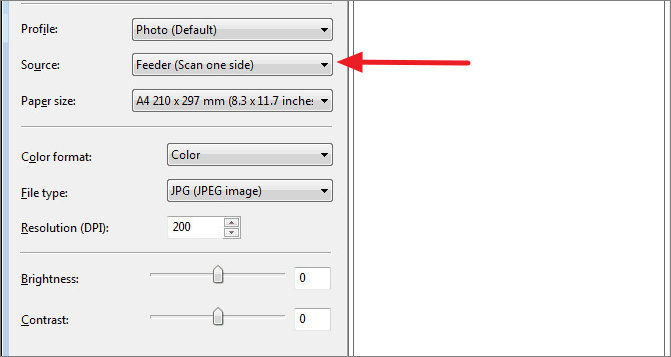
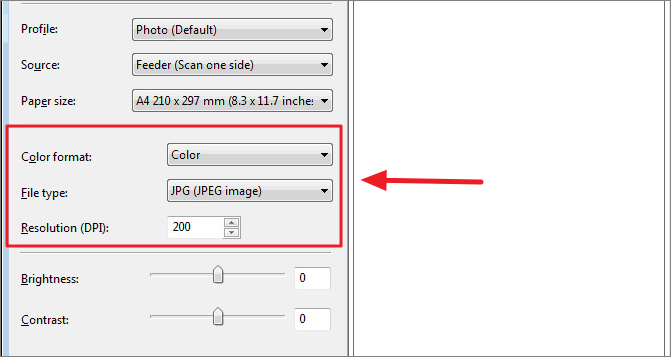
- Then, choose your color format (Color, Grayscale, or Black and White), set the appropriate resolution, and select the file type (BMP, JPEG, TIF, or PNG).
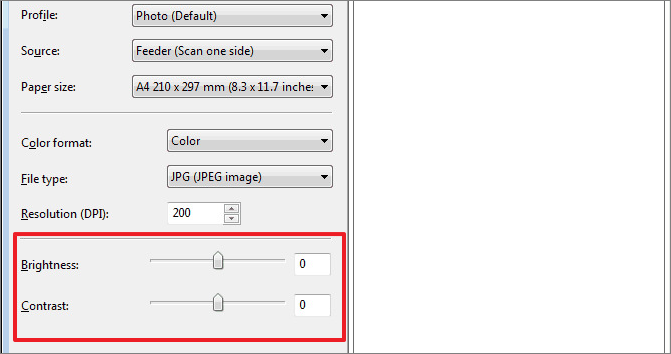
- Finally, you can adjust the brightness and contrast of the document/image if needed.
- Once you’re done, click the Preview button to see how your document will appear.
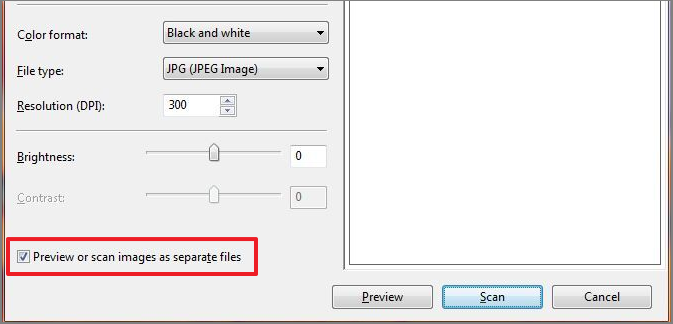
- If you’re scanning multiple smaller images at once using the flatbed scanner, saving each image as a separate file, don’t forget to select the Preview or scan images as separate files.
- Once you’re satisfied with the settings, click the Scan button to scan and save the files.
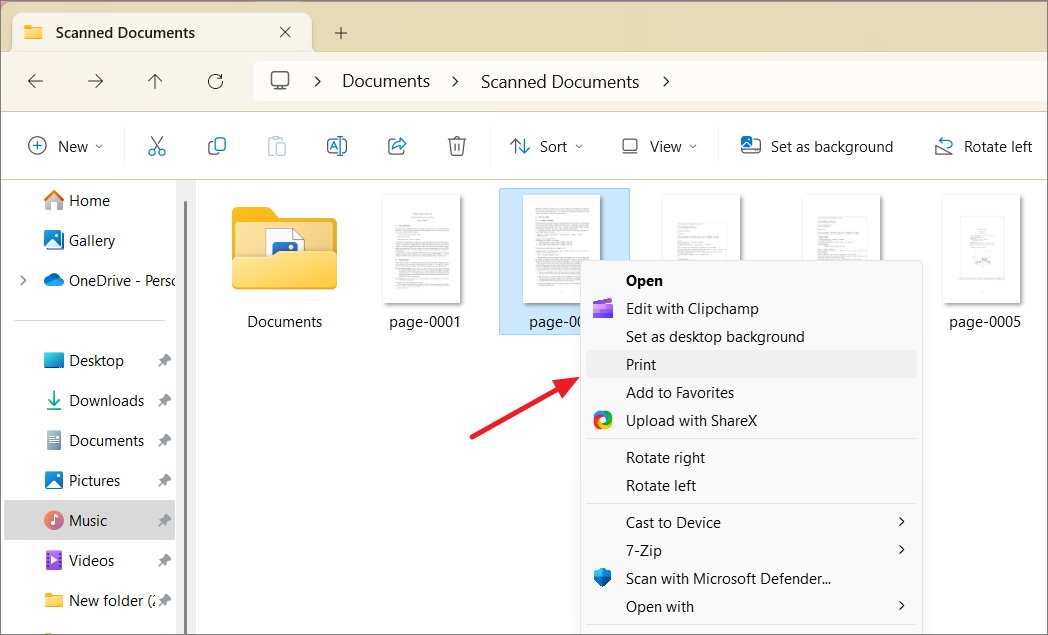
- You can find your scanned files in the Scanned Documents inside the Documents folder.
Convert the Scanned Image to PDF
The app doesn’t provide a direct option to save the scanned document as a PDF. However, there’s a workaround to save the file as a PDF. Let us show you how:
- Open File Explorer and go to
C:\Users\ username \Documents\Scanned Documents. - Find and right-click the image you want to convert as PDF, then select Print.
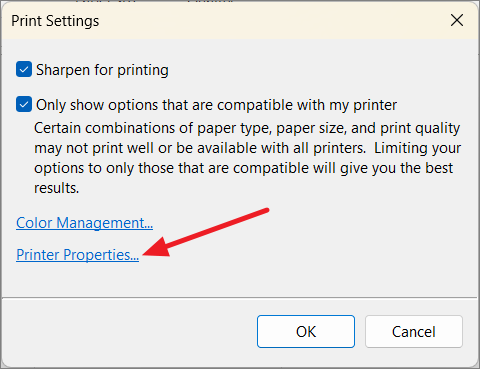
- Select Microsoft Print to PDF from the Printer drop-down.
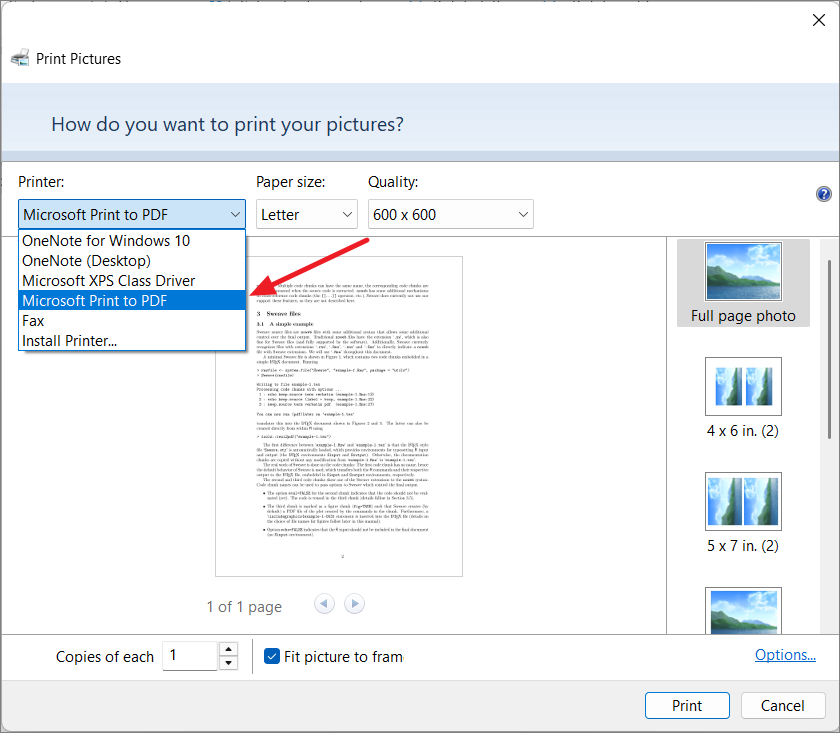
- Then, click Options in the lower right corner.
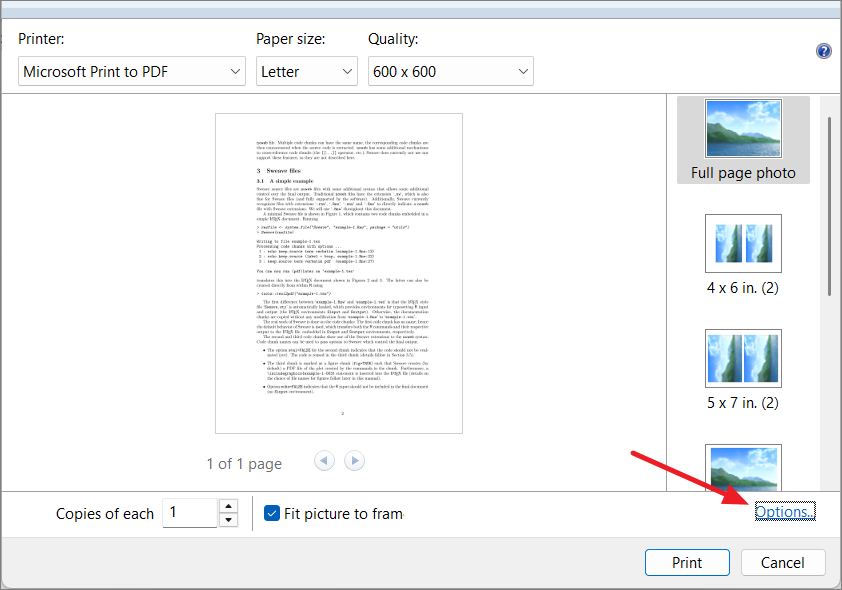
- In the pop-up window, select Printer Properties.
- Next, select the page orientation and click OK.
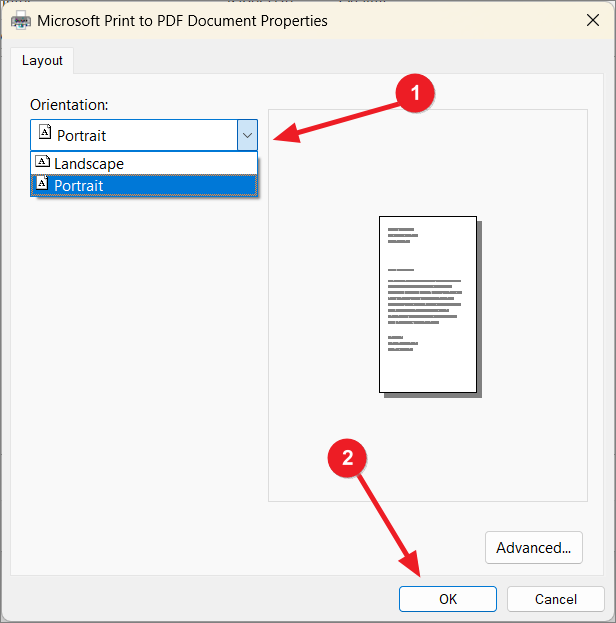
- After that, click Print.

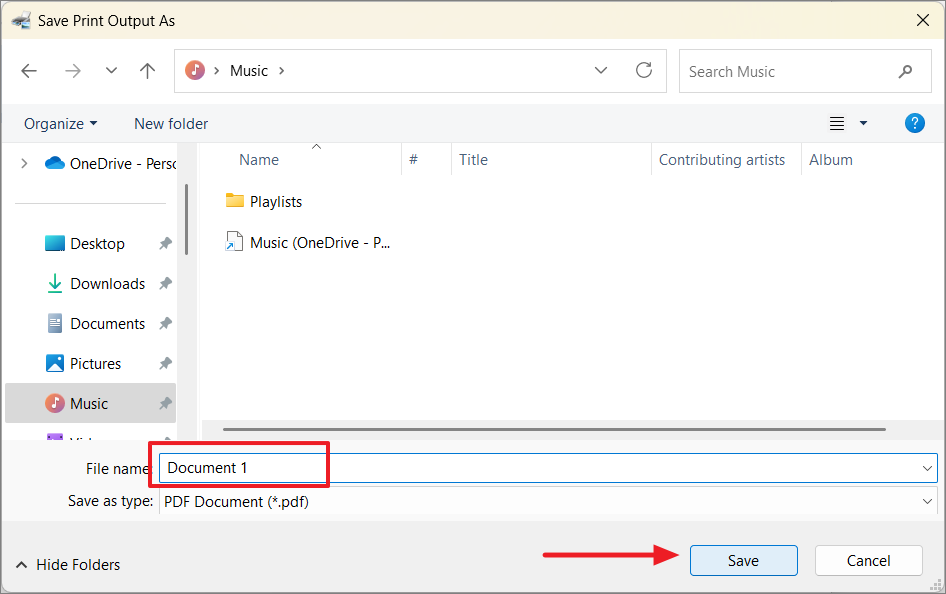
- Give a name to the file and click Save.
If you want to merge multiple pages into a single PDF file, follow these steps:
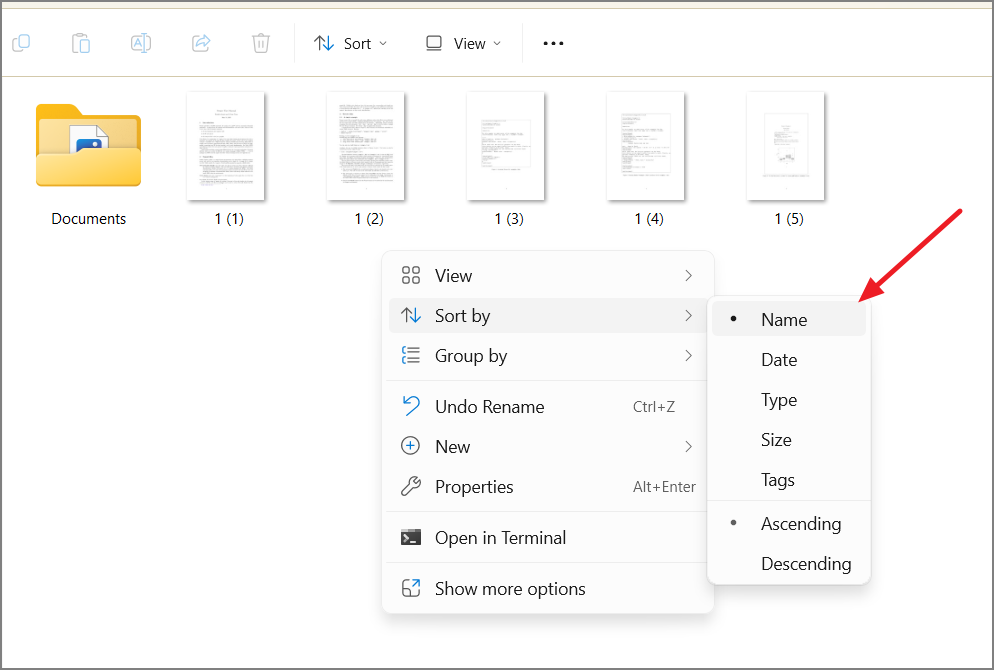
- Rename the scanned files in sequential order. For instance, the scanned document you want as the first page should be renamed as ‘1’, the second page as ‘2’, and so on.
- Then, sort the files by right-clicking the folder and selecting Sort by > Name.
- After that, select all the scanned files.
- Then, follow steps 2 – 8 from the above section to merge images into a single PDF.
If you find the process of scanning multiple documents into a single PDF too complicated, you might want to refer to our other guide on that.
Advanced printers like HP, and Canon come with a variety of extra features that make them even more useful for specific tasks. Some of these include duplex scanning (two-sided), which lets you scan both sides of a page at the same time, automatic text recognition (OCR) that pulls text from scanned docs, advanced color correction for better image quality, and wide-format scanning to handle larger documents or images.
Remember that these optional features may vary depending on the printer model and brand.
Organizing and Storing Scanned Documents
After scanning your documents, it’s important to organize and store them effectively for easy access. Here are some practical tips to help you out:
- Naming and Categorizing: Use clear and distinctive file names. Create folders for different categories, dates, or projects to keep your files well-organized. If you’re scanning multiple pages on a flatbed, make sure to name them in sequential order.
- Cloud Storage: Consider using popular cloud storage services like Google Drive, Dropbox, or OneDrive to securely store and access your scanned documents from anywhere.
- Backup: Regularly back up your scanned files to prevent any potential data loss. This can be done using external hard drives, cloud storage, or network-attached storage (NAS) devices.
FAQs
Q1: How do I scan a document on an Android phone?
Many modern printers support mobile scanning. Just install the printer’s mobile app, place the document on the scanner bed, and use the app to scan documents without the need for a computer. If you don’t have a printer on hand, scanning a document using an Android phone is now easier than ever, thanks to various scanning apps like Adobe Scan, CamScanner, and Microsoft Office Lens.
Q2: Is it possible to scan documents on a Canon printer?
Absolutely! Many modern Canon printers come equipped with scanning capabilities. If the printer is labeled as an all-in-one or multifunction printer, rest assured that it can scan documents. Just follow the manufacturer’s guidelines for scanning using your specific Canon model.
Q3: What’s the process for scanning a picture on iPhone Notes?
Open the Notes app, create a new note or edit an existing one, tap the camera icon, and select Scan Documents. Then, position the photo within the frame, capture the image, and then tap Keep Scan to save the image.
Q4: How do I scan a barcode with my phone?
Most Android phones and iPhones include a pre-installed scanner app. If you don’t have one, you can download a barcode scanner app from the app store. Once installed, open the app and point your camera at the barcode so it’s visible in the viewfinder. Let the app scan the barcode, and show you the information it contains.


